How to Create a Flowchart in Excel
Edraw Content Team
Do You Want to Create Flowchart?
EdrawMind helps move ideas forward, faster and better. Learn from this guide to know everything about how to create a flowchart. Just try it free now!
A project always follows a certain procedural flow before moving towards its practical demonstration. There are many techniques of showing how a project would be executed; however, professionals consider the use of flowcharts as the most effective technique to explain the complete system or activity. A flowchart is a diagram of the sequence of actions or processes that would come in a certain order while working on the project.
To make a flowchart, the need for perfect software is evident for effective work. Thus, this article has made it simple by providing a unique guide on how to create a flowchart in Excel, followed by another impressive tool that enhances workability.
1. How to Create a Flowchart in Excel?
We have been seeing Microsoft Excel from the years of our initial use of the computer. Microsoft Excel is one of the most mainstream software utilized on a large scale by millions of users throughout the world. The reason for using Excel is, however, diverse. Excel presents itself as a spreadsheet software that can be exceptionally used for multiple purposes.
You would've thought, how can Excel be this proficient in providing flowchart features? Combined with certain advanced tools, Excel does offer a source to its users for creating flowcharts. However, it is important to understand how to create a flowchart in Excel to understand the workflow across the tool. To cover this, we have provided a step-by-step guide to making flowcharts in Excel:
1.1 Manual Flowchart
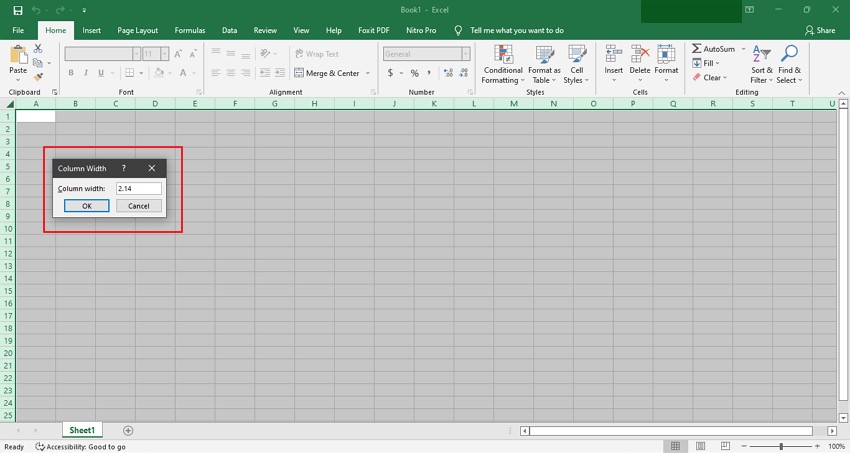
Step 1: Adjust Column Width
To start the process, you need to open a new worksheet. Click on the 'triangular-shaped' icon between the column and row headings to select the complete sheet. Right-click on any column to select the option of "Column Width." Following this, set a number in the dialog box and click "OK".
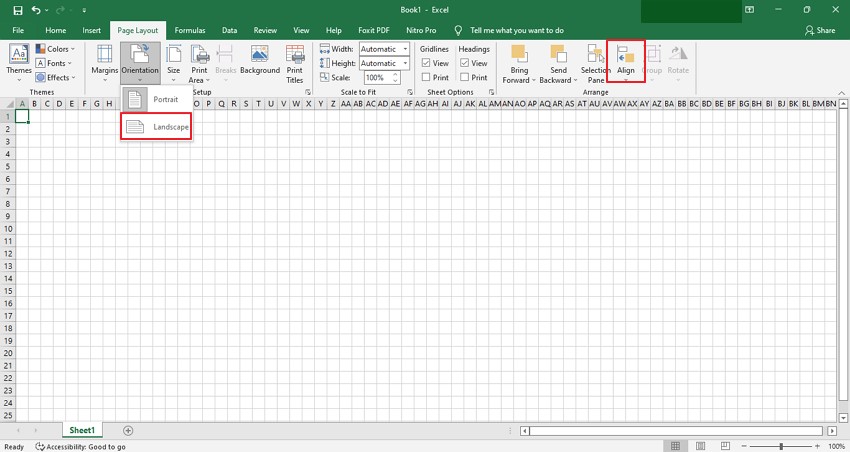
Step 2: Customize Page Layout
Proceed to the "Page Layout" tab and move forward to the "Arrange" section. Select the "Align" option and click on "Snap to Grid" from the drop-down menu. On the same tab, you will find the option of "Orientation". Select "Landscape" to change the orientation.
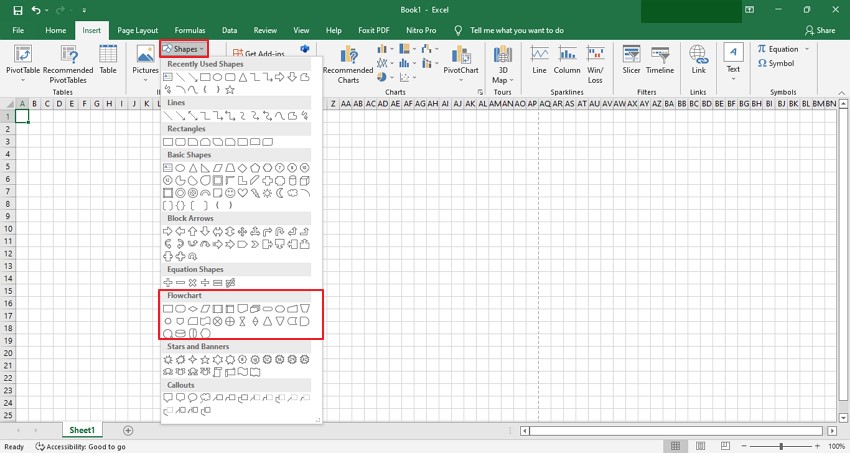
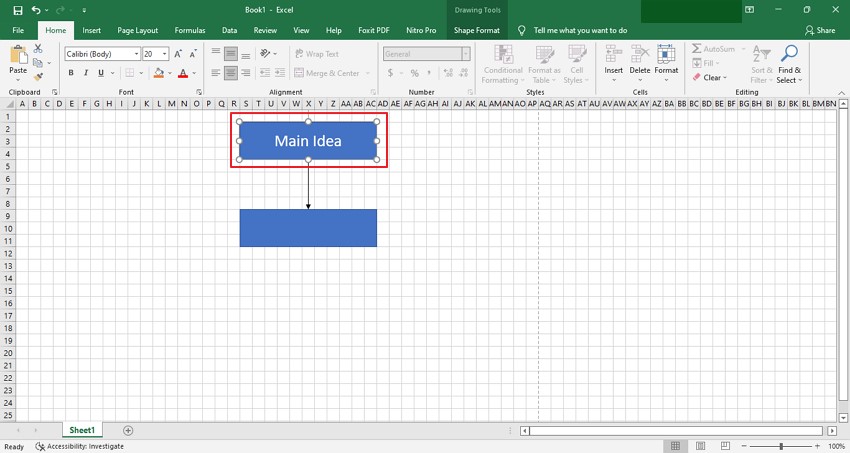
Step 3: Add Flowchart Shapes
Once changed, proceed to the "Insert" tab and click on "Shapes." Select the shape you wish to add and set up the flowchart shapes accordingly.
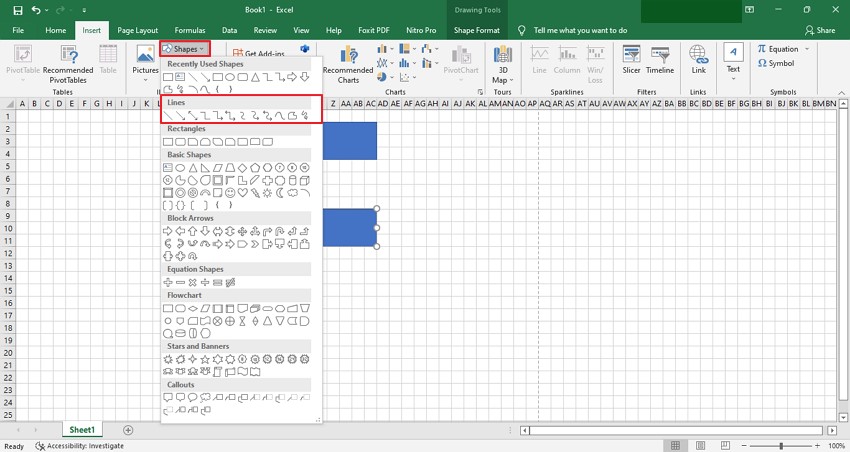
Step 4: Insert Lines & Arrows
After adding the shapes, move across the same "Shapes" section on the "Insert" tab and select "Line" or "Arrow" as connectors to the shapes. Add the lines across the shapes to develop the flowcharts.
Step 5: Add Flowchart Text
To add the text across the shape, double-click any shape and include the text across the flowchart. Once done, your flowchart is completed.
1.2 SmartArt Flowchart
Step 1: Launch and Select Flowchart Template
You need to launch Excel on your computer and open a Blank Workbook. Once opened, proceed to the "Insert" section and click on "SmartArt." You need to select any particular template from the "Process" category. For this method, we shall consider the 'Vertical Process'.

Step 2: Fill Flowchart with Text
As you have added the SmartArt template flowchart on the Excel sheet, you can add text across the text pane. Fill out the flowchart with the required text.
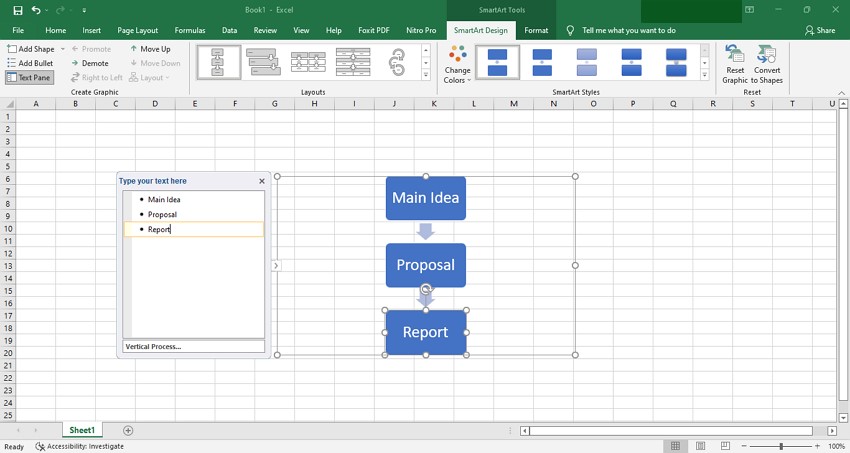
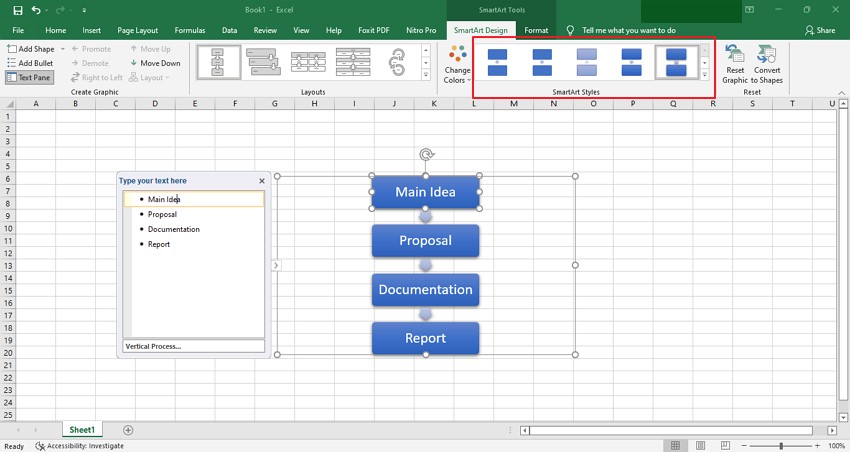
Step 3: Add Sections and Change Style
To add another section in the flowchart, you can simply tap "Enter" while putting your cursor across the text pane where you wish to add one. To make a subtopic, tap the "Tab" button on your keyboard to make a sub-topic across a certain sector of the flowchart. You can also change the style of the flowchart across the provided options in the 'SmartArt Styles'.
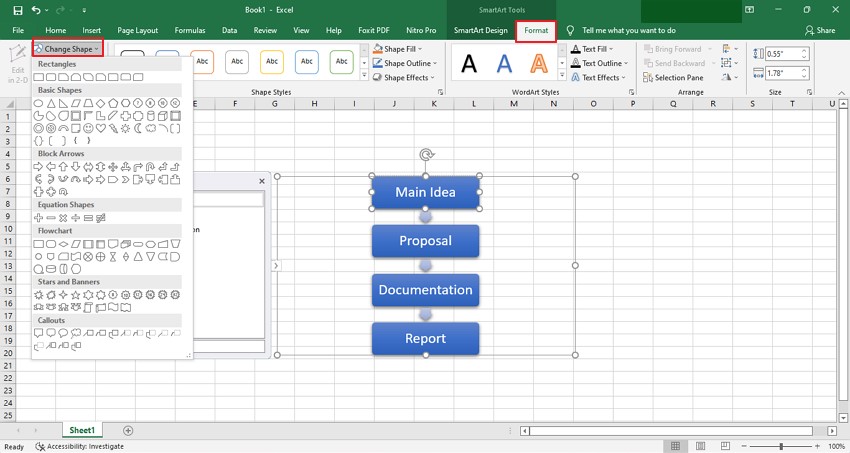
Step 4: Change Shape of a Particular Process
If you are looking forward to changing the shape of any section of your flowchart, click on the shape you wish to change and proceed to the "Format" section on the top menu. Click on "Change Shape" and select any shape that you are looking forward to change.
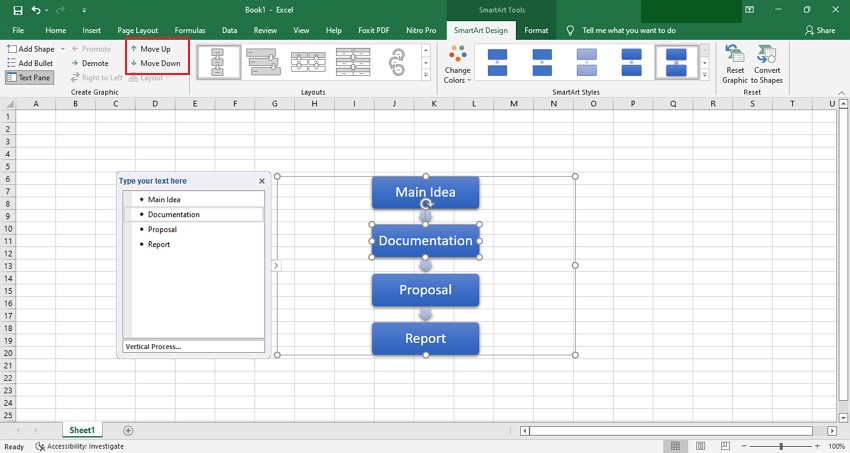
Step 5: Change Location of a Process in Flowchart
You can also move a shape up or down according to your requirements. Find the option of "Move Up" or "Move Down" in the "Create Graphic" section to change the location of a particular process in the flowchart.
2. Limitations of Using Excel to Create a Flowchart
Once you have learned how to create a flowchart in Excel, you may have realized some hindrances and limitations that stop you from making the perfect flowchart for your project. Look through these limitations to open up your mind out using Excel to create a flowchart:
- Building a complete flowchart from scratch can be torturous without the proper tools. Regardless of using a template, you have to make every small tweak across the flowchart all by yourselves. Moving a shape from a position, fixing another shape, or writing down the text in shape can be extremely tiring.
- Every modification in building a flowchart on Excel can get frustrating. If you move in modifying one step of the flowchart, this may lead to correcting the complete flow of the flowchart. You cannot even add one element in between the flowchart without putting yourselves in a fuss.
- While managing a project, it can usually get complicated due to the complexity of diagrams. Excel does not provide any system for collaborating with fellow workers across the platform. This can essentially stop you from cooperating with other people while building up a flowchart in Excel.
3. How to Create a Flowchart in EdrawMind
EdrawMind provides an exceptional environment for creating a flowchart across the platform. With coverage of all the problems one might face in making a flowchart across Excel, the appealing interface of the platform makes it one impressive choice in the market.
The flexibility offered in EdrawMind is of optimal quantity that helps users save time and build a good flow. To make a proper flowchart on EdrawMind, you need to look across the following details:
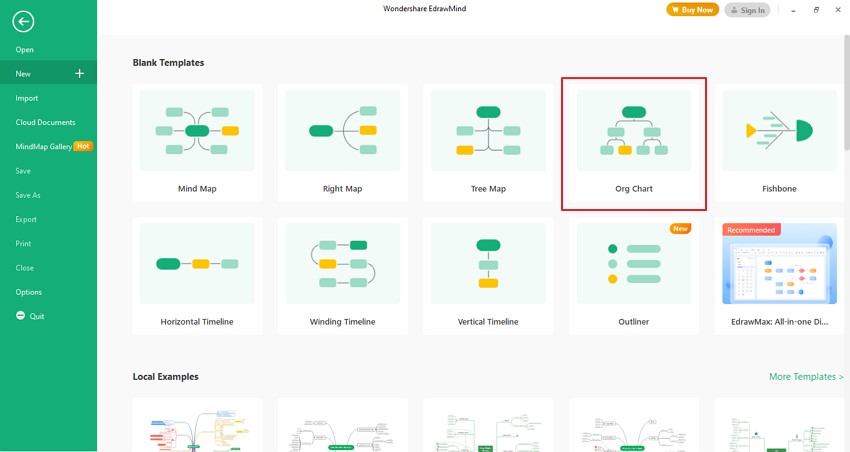
Step1 Launch and Select Template
Download and launch the latest version of EdrawMind on your computer. Proceed to select a flowchart template according to your requirement. You can also select 'Org Chart' for this process.
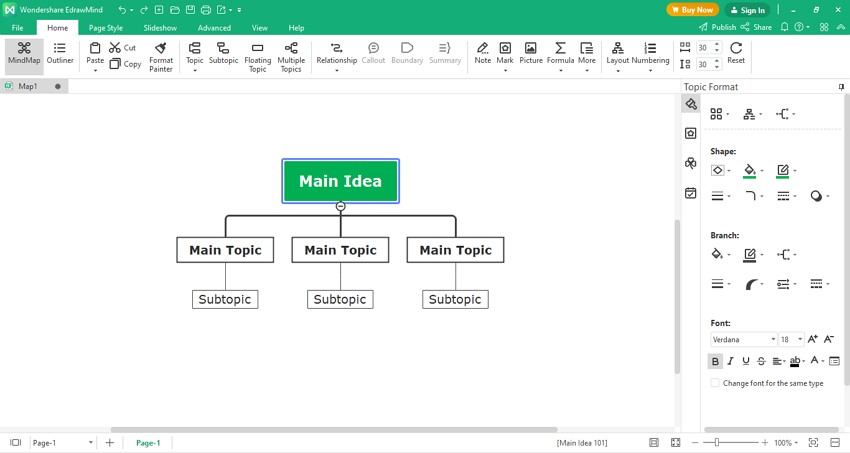
Step2 Make Edits across The Flowchart
Once a new window opens up with the selected template, you can now easily make changes across it. To make the flowchart extensive, if you wish to add a Topic or a Sub-topic across it, it can be done with a couple of buttons. To add a Main Topic across your template, click "Enter." Conversely, you have to click "Tab" to add a Sub-topic across any selected Main Topic.
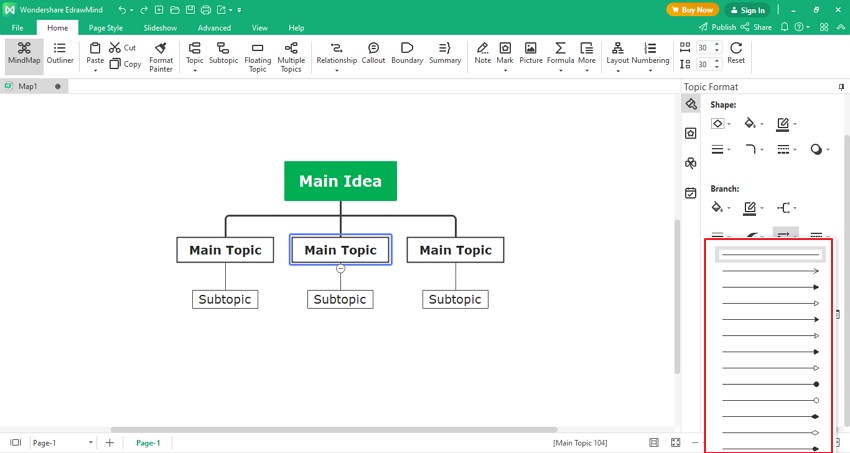
While adding topics and sub-topics across your flowchart, you can also customize your template with a set of different features. To change the arrow between the progressing tabs of the flowchart, you need to select the required tab and proceed to the "Branch Arrows" option across the Branch section. Select any branch or arrow that you wish to change for a certain sector of the flowchart.
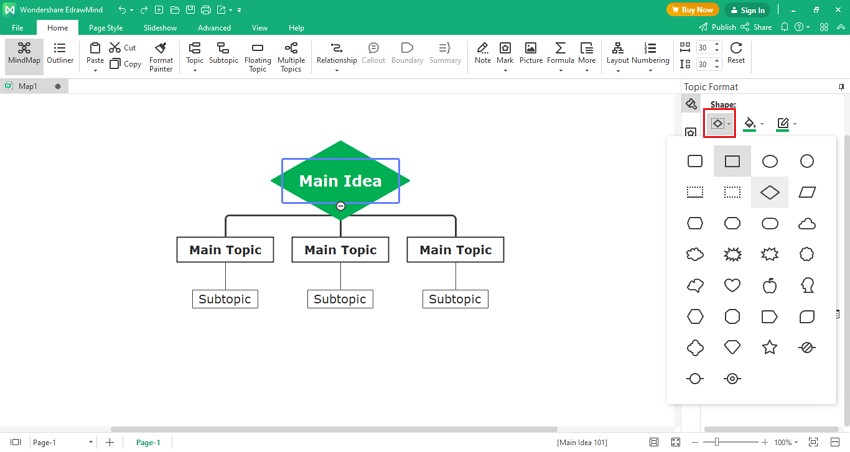
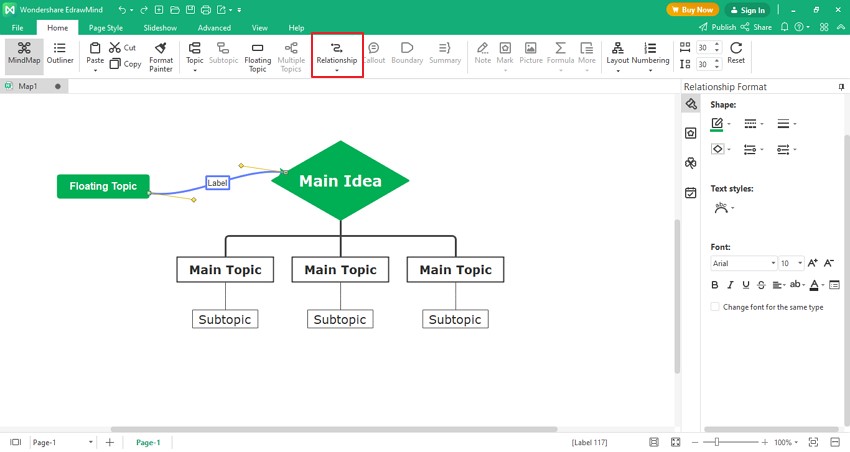
If you are looking forward to changing the shape of any particular element of the flowchart, select it and proceed to the "Shape" section. Select any shape that you wish to change it to. To make things better and cognitive in flowchart creation, EdrawMind provides you the option of adding a "Floating Topic" besides the flowchart. Double-click anywhere across the sheet to create a floating topic.
Once added, you need to select it and proceed to the "Relationship," and select the other section that you wish to connect to. Write the details of the relationship across the 'Label' section.
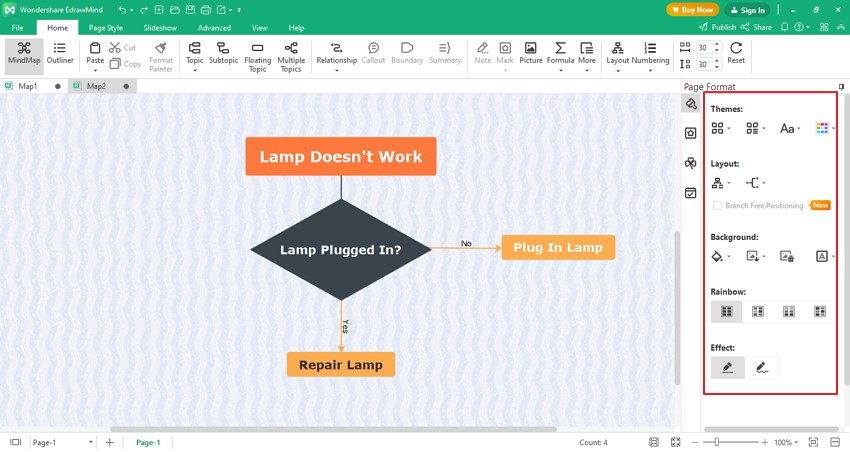
Step3 Change Flowchart Themes
While creating a flowchart, you can also change the style of your flowchart. Unselect the flowchart and find the option of "Themes" in the right-side panel. Select an appropriate theme according to your liking.
4. Save an EdrawMind Flowchart as Excel File
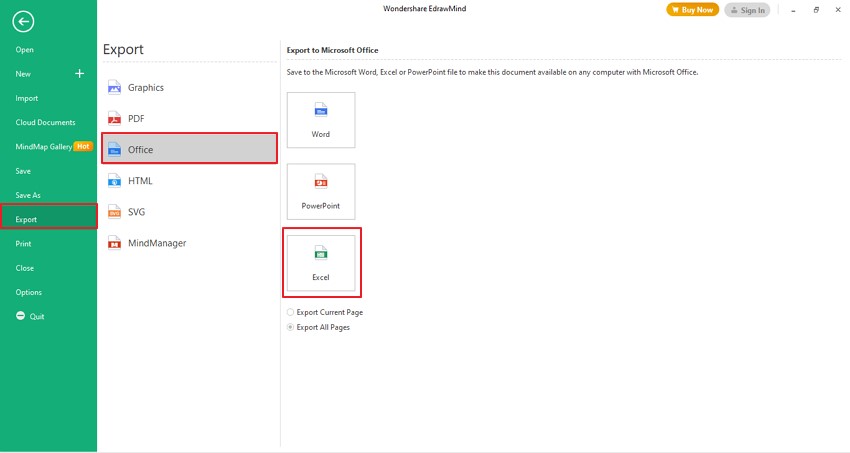
As you are done setting up your flowchart across EdrawMind, you can easily export the file in Excel format. Proceed to the "File" tab and find the "Export" option on the left-side panel. Click on "Office" followed by "Excel" to save the flowchart across your computer as an Excel file.
5. Templates of Flowchart in EdrawMind
There are an extensive set of templates that you can find across EdrawMind for building up a flowchart. Here are some great examples of flowcharts that you can consider to make a flowchart for your project across EdrawMind.
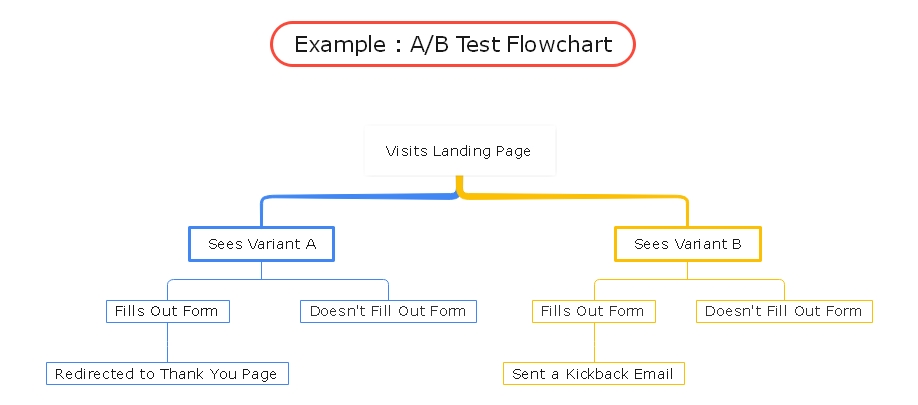
- A/B Test Flowchart
![a/b test flowchart]() Click here to download EdrawMind
Click here to download EdrawMind
(For Win)Click here to download EdrawMind
(For Mac)Click here to download EdrawMind
(For Linux)A/B Test Flowchart

This proficient example of a flowchart displays a very simple set of possibilities to the viewers. With two potential outcomes displayed in the example, you can add as many outcomes as you want across the template. Such flowcharts are extremely important in setting up a defined goal for its users across the flowchart.
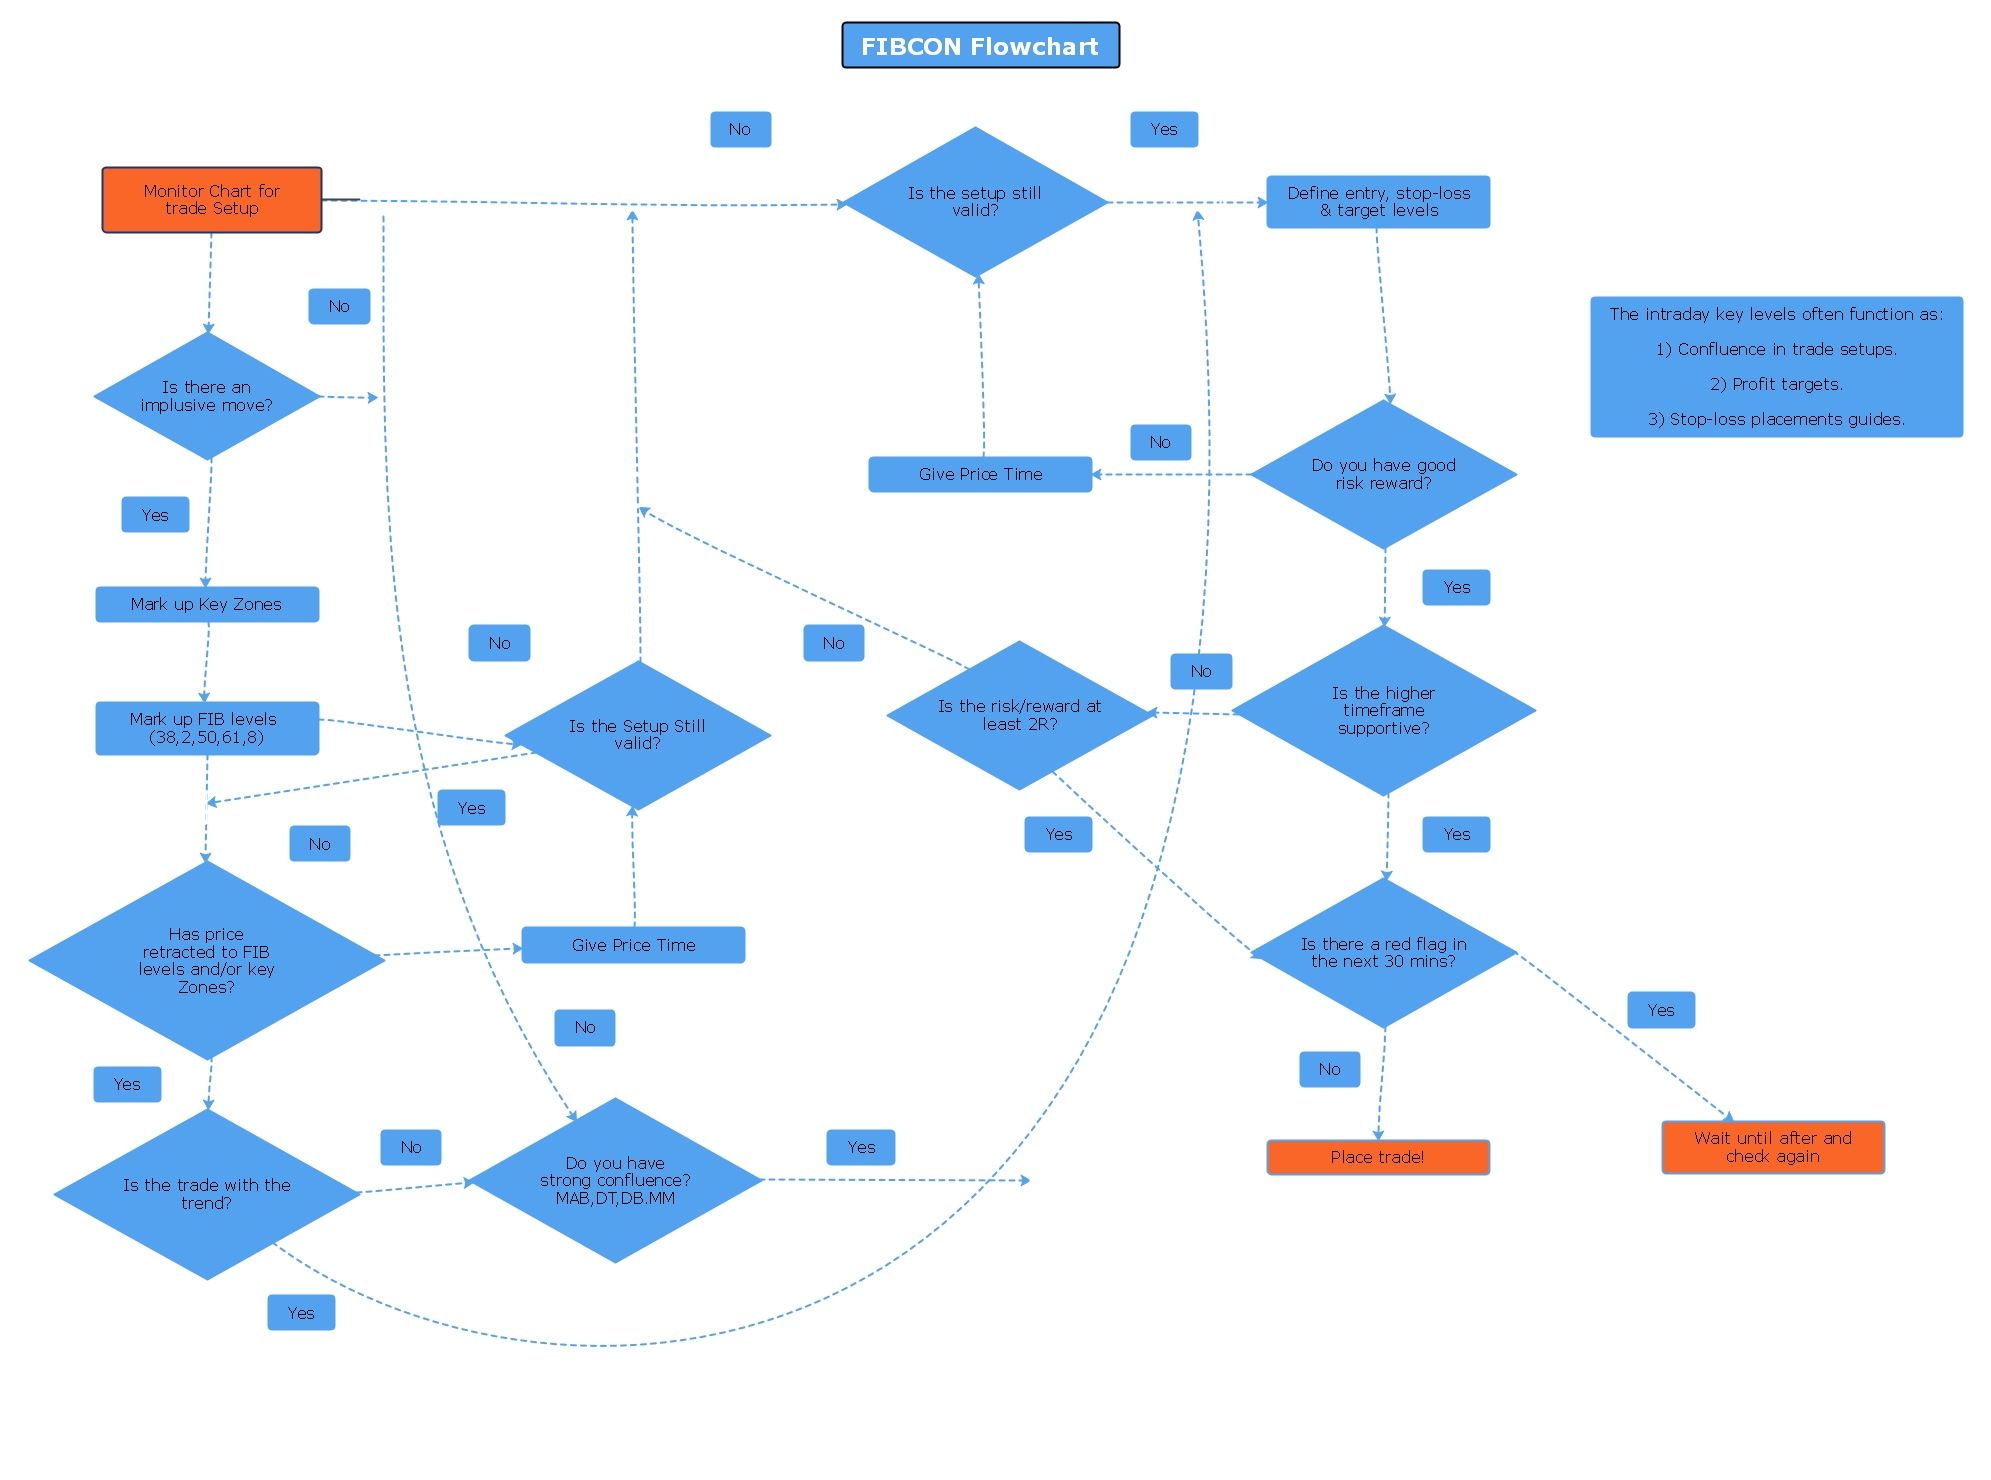
- FIBCON Flowchart
![fibcon flowchart]() Click here to download EdrawMind
Click here to download EdrawMind
(For Win)Click here to download EdrawMind
(For Mac)Click here to download EdrawMind
(For Linux)FIBCON Flowchart Software engineering requires a myriad of flowcharts. Their flowchart development is constructed on multiple levels and possibilities, which requires such templates of flowcharts. A logical structure in a flowchart is a requirement for engineers, covered with this flowchart template.
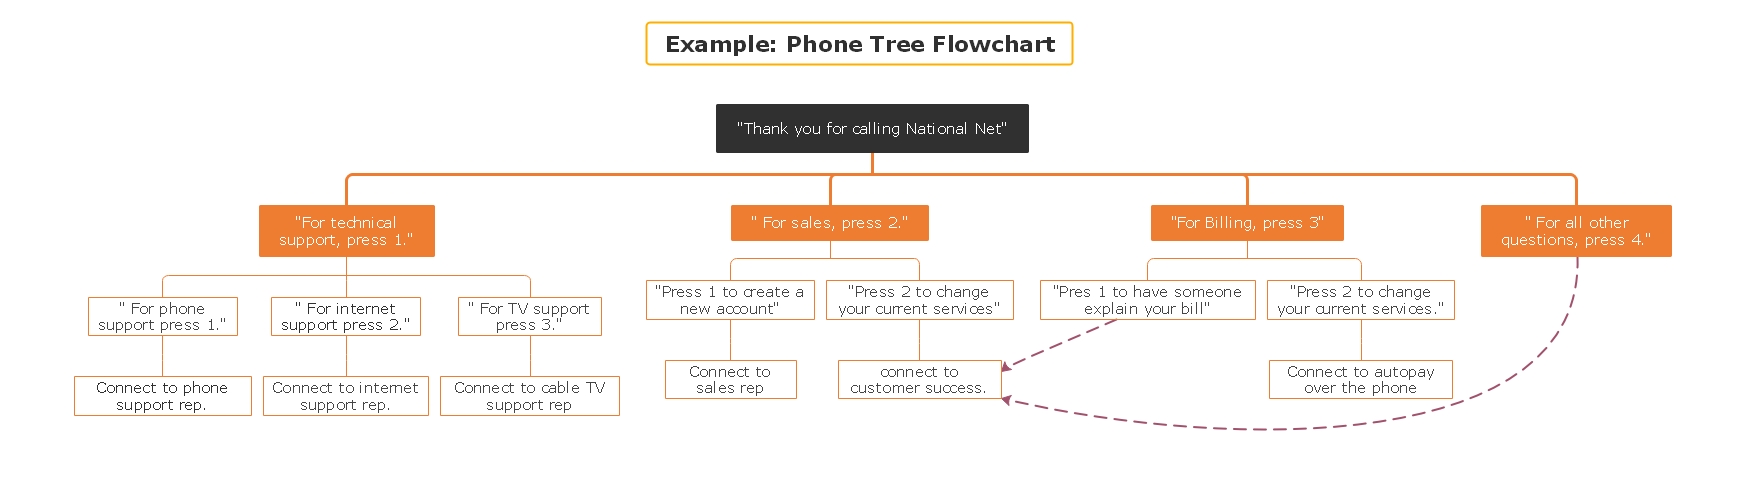
- Phone Tree Flowchart
![phone tree flowchart]() Click here to download EdrawMind
Click here to download EdrawMind
(For Win)Click here to download EdrawMind
(For Mac)Click here to download EdrawMind
(For Linux)Phone Tree Flowchart If your project has several branches and levels in a procedure that are not executed at the same, this flowchart template provides you with the appropriate structure. With some endpoints to each branch, this flowchart propagates and provides the viewers with an idea of the proceedings within a company.
6. Key Takeaways
This discussion has proficiently covered a detailed guide on how to create a flowchart in Excel. With an introduction to Excel and the limitations of making a flowchart across Excel, a comprehensive overview of EdrawMind has been stretched in the article. The platform provides users with a proper platform to record and arrange ideas across an outline. Along with that, you can set up a presentation across the platform for an effective understanding of your viewers.
EdrawMind makes itself a perfect tool to make flowcharts of its capability of sharing and collaborating with the team while keeping the user in control.
You May Also Like
How to Make a Concept Map
HOW-TO & TIPS
Innovative Solutions: Learn How to Brainstorm Like a Pro
HOW-TO & TIPS